Unblur Video Footage: A YouTuber's Guide

You’ve spent hours shooting what you thought was the perfect B-roll. You get back to your computer, import the files, and a sinking feeling hits you. The footage is just a little soft. It’s slightly out of focus, maybe a bit shaky, or just not as crisp as you need it to be for your YouTube channel. Before you drag those clips to the trash, you should know there’s a powerful solution.
Blurry video can happen for many reasons, from a missed focus pull to motion blur on a windy day. In the past, this often meant the shot was unusable. Today, technology offers a fix.
While it's always best to capture clear footage from the start, specialised software can sharpen, de-noise, and upscale your video, saving you from a costly and time-consuming reshoot. This is where a quality Video Enhancer becomes an essential part of your editing toolkit. It works by using intelligent algorithms to analyse and repair imperfections frame by frame.
These tools are not just for salvaging mistakes. They can also improve the overall quality of older footage, enhance clips from less advanced cameras, or upscale standard definition video for a 4K project. The core technology often stems from algorithms first developed to Unblur Image files, which have now been adapted for the much more complex task of processing thousands of frames in a video sequence. Let's explore how you can use these tools to fix your B-roll and elevate your content.
WHY DOES VIDEO GET BLURRY? COMMON CAUSES
Understanding the root cause of blurry footage can help you prevent it in the future and choose the right method to fix it. Here are the most common culprits that YouTubers and content creators face.
1. Missed Focus
This is the most frequent reason for soft footage. It happens when your camera's autofocus locks onto the background instead of your subject, or when you manually set the focus incorrectly. Even a slight miss can make a shot unusable, especially when viewers are watching on large, high-resolution screens.
2. Motion Blur
Motion blur occurs when your subject, or the camera itself, moves too quickly for your camera’s shutter speed. A slow shutter speed creates a dreamy, smooth effect for certain shots, but it will ruin the clarity of a fast-paced action scene or a simple pan. This is a common issue for creators who shoot vlogs on the go without proper stabilisation.
3. Camera Shake
Without a tripod or gimbal, it's nearly impossible to hold a camera perfectly still. This slight movement, known as camera shake, introduces a subtle, jittery blur that degrades the professional look of your video. While in-camera or in-lens stabilisation helps, it can't always eliminate the problem completely.
4. Low Resolution and Compression
Sometimes, the footage isn't blurry, it’s just low resolution. If you try to scale up a 720p clip to fit a 1080p or 4K timeline, it will appear soft and pixelated. Additionally, aggressive compression, either in-camera or during file transfer, can strip away fine details and introduce artefacts that make the video look blurry.
THE TOP SOLUTION: USING A DEDICATED VIDEO ENHANCER
When you need to fix blurry footage, your best bet is to use a tool designed specifically for the job. While professional editing software like Adobe Premiere Pro or DaVinci Resolve has sharpening filters, they often can't match the sophisticated results of an AI-powered enhancer.
Our Top Recommendation: UnblurImage.ai Video Enhancer
This tool stands out as the premier choice for creators who need reliable, high-quality results without a steep learning curve. It leverages artificial intelligence to do more than just apply a simple sharpening effect. It intelligently analyses the content of your video to reconstruct details, reduce noise, and correct for motion blur and focus issues.
#### Key Features and Benefits:
* AI-Powered Frame Analysis: Instead of applying a uniform effect, the tool examines each frame to identify and repair specific problems. This means it can fix blur in one part of a clip without over-sharpening another.
* User-Friendly Interface: You don't need to be a professional video editor to use it. The process is straightforward, requiring you to upload your clip, select your desired enhancement level, and let the AI do the work.
* Focus and Motion Blur Correction: It excels at fixing the two most common types of blur. The algorithms are trained to recognize the patterns of motion streaks and soft focus, effectively reversing the effect to restore clarity.
* Upscaling Capabilities: Have an old clip shot in standard definition? This enhancer can upscale it to 720p, 1080p, or even 4K, making it usable in modern projects. The AI fills in the missing pixel data intelligently, which produces a much cleaner result than traditional scaling methods.
* Noise Reduction: Low-light footage often suffers from digital noise or grain, which can make it look messy and unprofessional. The enhancer includes a powerful de-noising feature that cleans up the grain without making the footage look waxy or unnatural.
HOW TO UNBLUR YOUR B-ROLL: A STEP-BY-STEP GUIDE
Using a tool like the UnblurImage.ai Video Enhancer is a simple process. Here’s a general workflow you can follow to save your blurry footage.
Step 1: Upload Your Video Clip
First, export the blurry clip from your main editing timeline. It's best to use the original, unedited file if you have it to give the AI the most data to work with. Navigate to the video enhancer tool and upload your file. Most tools support common formats like MP4, MOV, and AVI.
Step 2: Choose Your Enhancement Settings
Once uploaded, you'll typically be presented with a few options. You might see settings for "Sharpening," "Denoise," "Upscale Resolution," or a general "Enhancement Level." If you're new to the process, starting with an automatic or recommended setting is a great choice. The AI will analyse the clip and apply the best combination of fixes.
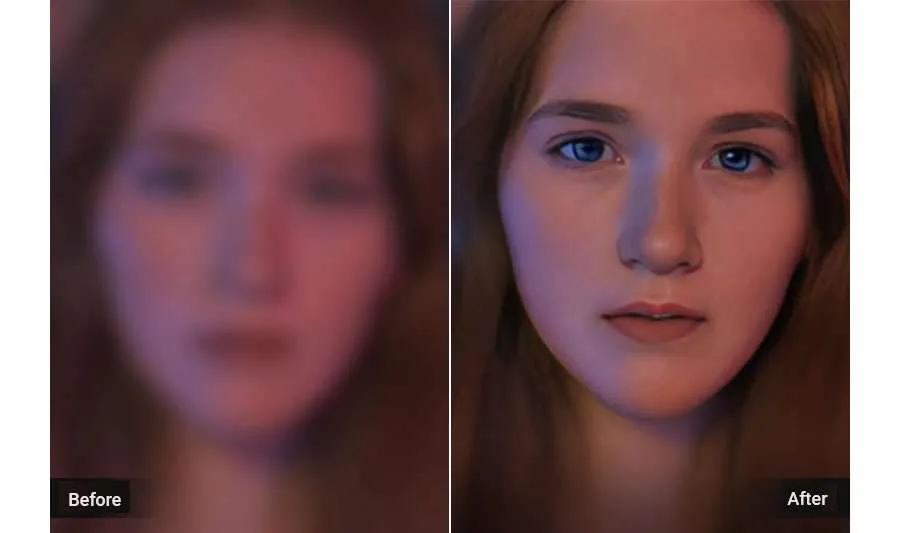
Step 3: Preview the Result
A good enhancer will offer a preview, often a side-by-side comparison, showing you the "before" and "after." This is a crucial step. Look closely at the details. Does the subject look clearer? Is the background distracting? Has any unwanted artifacting been introduced? If the sharpening looks too aggressive, you may want to dial back the settings and try again.
Step 4: Process and Download the File
Once you're happy with the preview, you can start the full processing. This can take some time, as enhancing a video is computationally intensive. The tool is analysing and rendering every single frame. The length of the clip and the output resolution will determine the processing time. After it's complete, you can download the new, enhanced video file.
Step 5: Import Back Into Your Project
Take your new, clean B-roll clip and import it back into your video editing software. Replace the old, blurry clip on your timeline. You may need to do some minor colour correction to ensure it matches the rest of your footage, as enhancement processes can sometimes slightly alter colours or contrast.
PRO TIPS FOR PREVENTING BLURRY VIDEO IN THE FIRST PLACE
While enhancement tools are powerful, the best strategy is always to capture crisp footage from the start. Here are some fundamental tips to keep in mind on your next shoot.
* Master Your Focus: If your camera has focus peaking, turn it on. It will highlight the parts of the image that are in sharp focus, making manual focusing much easier. For autofocus, use a single-point AF mode to tell the camera exactly where you want it to focus.
* Use an Appropriate Shutter Speed: A common rule of thumb is to set your shutter speed to double your frame rate. For example, if you are shooting at 24 frames per second (fps), a shutter speed of 1/50th of a second is ideal. This creates a natural amount of motion blur without being excessive. For fast-action shots or slow-motion, you'll need a much faster shutter speed.
* Stabilise Your Camera: A tripod is a creator's best friend. Use one whenever you can. For moving shots, a gimbal or even a simple shoulder rig can make a world of difference in reducing camera shake.
* Get Enough Light: Cameras need light to produce a clean image. In low-light situations, the camera will increase its ISO, which creates digital noise and can soften the image. Bring in external lights or shoot in well-lit environments whenever possible.
* Shoot in the Highest Quality Possible: Record your video at the highest resolution and best quality setting your camera allows. This gives you more data to work with in post-production and makes any necessary enhancements more effective.
Share: